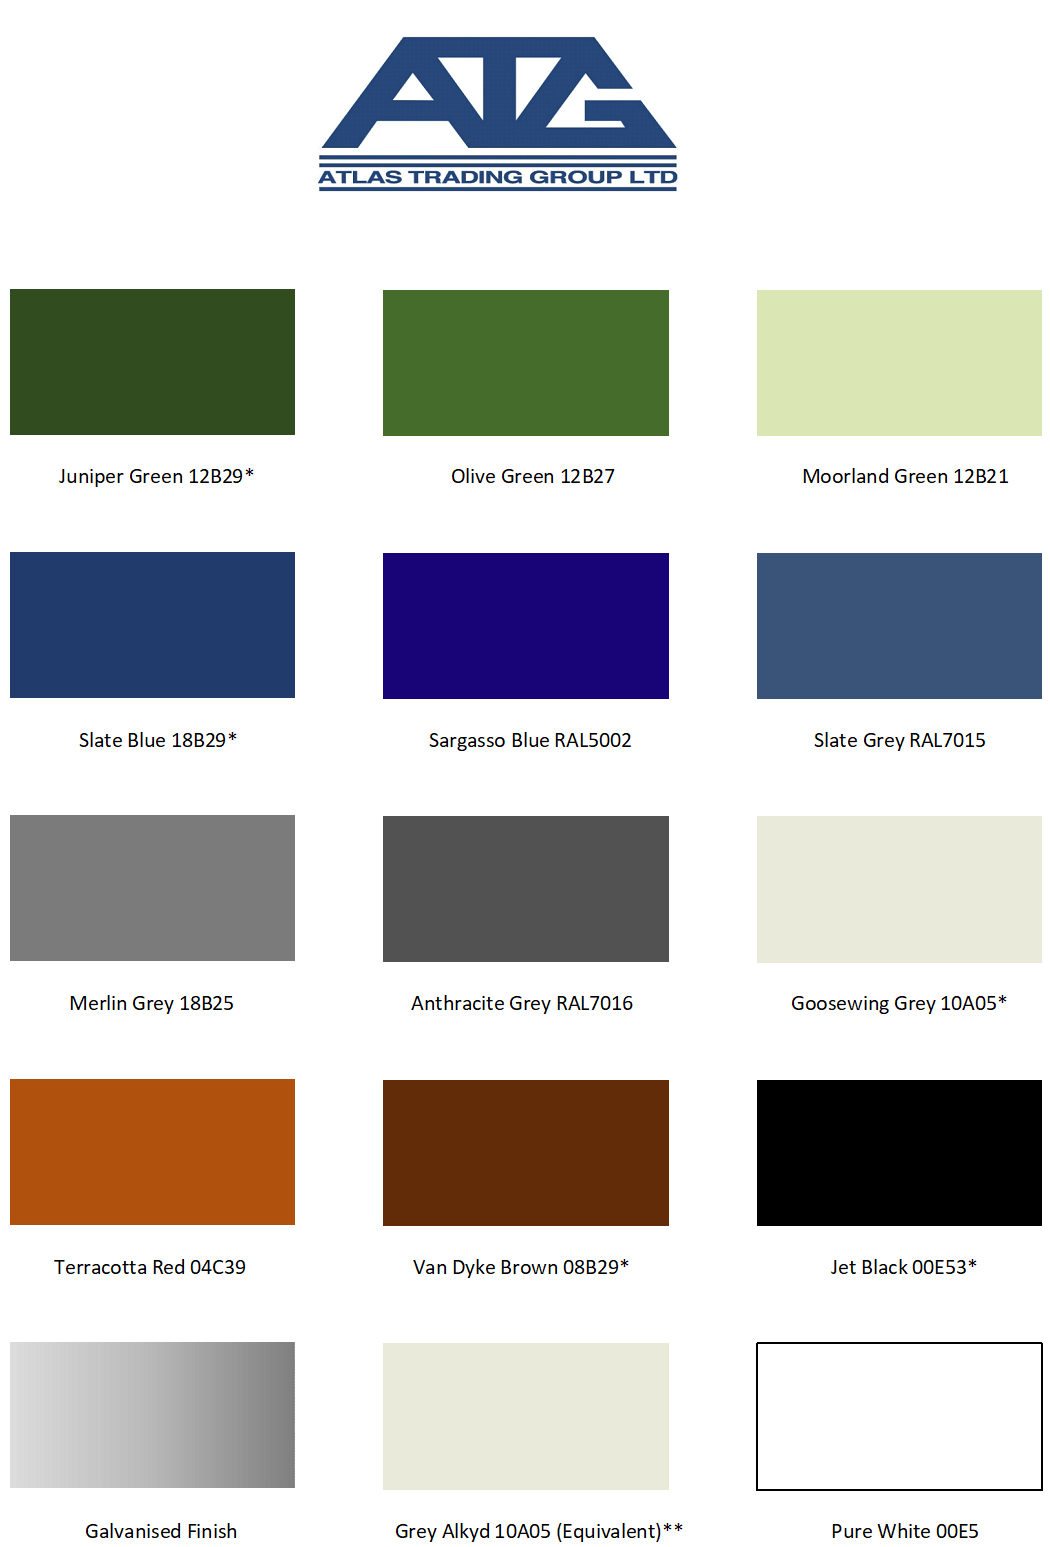
Tile Effect Roof Sheets
.5mm Gauge – Standard - Price on Application
.5mm Gauge – Non – Drip Backing - Price on Application
Maximum Length of 6.000 metre
Minimum Length of 1.000 metre
Note: roof sheets must be laid on a roof pitch of 12 degrees or more
Various Colours Available To Order
Tile sheeting can only be laid left to right due to only being tiled one way; making sure the overlapping edge is at the start of the process ready for the next sheet to overlap the underlapped side (as shown).
We recommend laying away from the common prevailing wind to help prevent wind whistling and water capillary but appreciate, on this profile it sometimes can’t be helped. Please note the overlapping edge is always the unfinished castle, overlapping the finished castle.
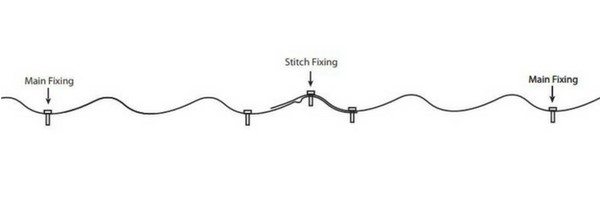
Fixing screws are highly recommended to screw between the strengthening ribs in the valley of the sheet (as shown). Usually fixed in the 1st, 3rd and 5th trough (left, middle, right) to have a symmetrical appearance and a strong holding into the purlins. Fixing in every purlin if possible but every two is adequate on short purlin spacings.
BOX PROFILE TILE SHEETING
32/1000 tile effect sheeting (single skin slate effect) has 6 castles & 2 strengthening ribs in the troughs with a profile pitch of 200mm and profile depth of 32mm. This profile has a box profile tile-effect finish.

PAN PROFILE TILE SHEETING
33/1000 pan tile effect sheeting (single skin slate effect) has several wavy castles using multiple radius’ with a profile pitch of 200mm and profile depth of 33mm. This profile has a pan profile tile-effect finish.
Images shown are for illustration purposes only
We recommend using a maximum purlin spacing of either 300mm or 600mm for 0.5mm only, due to the tile centres being at 300mm. Having an irregular purlin centre may result in a tile crimp sitting directly onto the purlin creating an uneven lay in the finished roof.
Stitching the sheeting overlaps are very important (as shown). Stitching the overlapping castle every 300mm (each tile) is adequate but if you can fix at 600mm (every 2 tiles) if necessary. This will help prevent water capillary seeping underneath the sheet. Applying lap tape isn’t recommended with this profile but silicone can be used if you require to.
Ridge and Barge flashings are always fitted after the sheeting. Again, using the stitching screw to fix through the flashing into the castle of the sheeting. Once this process is complete then fitting a foam infill between the ridge end and the eaves end is recommended to help prevent birds / vermin entering the structure, and at the same time stops wind pushing anything through during poor weather conditions.
Please note we DO NOT recommend using foam infills if you have our Dripstop membrane system installed to your sheeting due to the roof requiring ventilation for the Dripstop to work at its optimum.
If the sheeting or flashings need cutting / trimming, we recommend using our Nibbler Attachment due to the clean precision cut it can offer. Angle grinders are commonly used but this will not offer a clean cut. A 110v Nibbler will be the most sufficient tool for this but a Nibbler Attachment Tool is handy if you only own a Drill.
Please contact us here for more information

